
Where Have All The Flowers Gone?
Let’s
take a Magical Mystery Tour back to the 60’s.
Remember
Woodstock?
We've
got to get ourselves back to the Garden.
Flowers in your hair.... Flowers everywhere....
Flowers in your hair.... Flowers everywhere....
I
love the flower girl.
So
don’t be counting Flowers on the Wall.
Let’s
go to a Garden Party.
There
is always something magical
about
linking flowers together.
Clover,
Dandelions, Daisies, whatever…..
I
love the colors and the simple beauty of it.
Well,
these flowers can be linked over and over again, anytime.
It
won’t matter if it is winter, spring, summer or fall.
Kai,
my youngest grandchild (4 yrs. old), told me,
“We
need lots of colors for the flowers.”
So
that is exactly what we did.
Grab your hooks and find some scrap yarn.
They
can be linked into Crowns, Bracelets, Necklaces,
Belts, Garland, and Skinny-Scarf-Lariats.
Belts, Garland, and Skinny-Scarf-Lariats.
They
are relatively quick to make (about 10-15 minutes for one complete Flower
Link).
I
did not use numbered Rows/Rnds in the instructions
because there is really only one row for each segment.
because there is really only one row for each segment.
Also,
there is only one final weave in, even though there are 3 colors.
Make as many Flower Links, in as many colors
as you want.
A bracelet that fits my hand only takes 4
Flower Links.
For the simplicity purpose of these instructions,
I just made one type of flower.
But you could add more single crochets to the
beginning base
to have more petals, or different kinds of petals.
to have more petals, or different kinds of petals.
If you do change the flower petals,
you may need to adjust the size of the connecting-stem-hole.
you may need to adjust the size of the connecting-stem-hole.
And you might want to experiment with other
types of yarns and hooks.
It looks beautiful with crochet thread and a
smaller hook, but is more time consuming.
As always, I hope you enjoy it.
And if you are going to San Francisco…..
Be sure to wear some Flowers in your Hair!
Worsted Weight Yarn (I used Sugar n Cream Cotton)
~
2 yards (153cm) for one Stem
~
24” for one Flower Center~ 2 yards for one Flower Petals
3.75 mm / F hook
Yarn needle
Scissor or
SnipsGauge: Not essential to construction
Size: One Flower with Stem = 2 ½” (6.4cm) in length and 1 ½” (3.8cm) across top of Flower
Abbreviations:
~ = Approximately
Beg = Beginning
Ch(s) = Chain(s)
Dc = Double Crochet
FO = Fasten OffMR = Magic Ring
RT = right
Sc = Single Crochet
Ss = Slip Stitch
St(s) = Stitch(es)
US Terminology

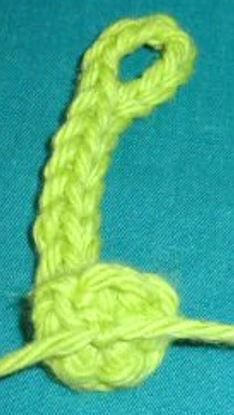
Stem (Starting at the top):
Start with a MR. Ch 1, 5 Sc in
ring.
Join with a ss to the 1st
sc. Pull gently to close the ring, but
leave a slight hole in the center.
Then take the working yarn end and
measure ~ 26 to 30” (66-76 cm), and cut the yarn.
Pull the long end of yarn through
the last loop of the joined-ss.

With the RT side (of the 5 sc’s) facing,
insert hook in center hole to the back.
Catch the yarn end and pull
through a loop, big enough to hold with your thumb.
Remove the hook from that loop.
Be sure to hold the first loop secure.
Insert the hook in the last
joining stitch (also front to back), and pull through another loop.
But continue to pull the entire
yarn end (the 26”) through to the front.

Replace the hook on the first loop
and pull it snug against the 5 sc’s so the first st will not be too
loose.
*** Now, CH 16, ss to the 8th
ch from the hook, ss in the next 8
chs, and pull the yarn end through the final loop.
Insert the hook from
the inside of the hole, and pull up the final yarn end.

Pull the beg yarn end
to tighten the center hole.
Then tie the yarn end
with the beg yarn about 3 times tight and secure.
Snip the ends to about 1/4 to 1/8”
(.6 to .3cm). This will be covered and not show.
A
Link Stem: If you want a link for a crown,
bracelet, belt or necklace.
Not necessary for a scarf or garland.
Not necessary for a scarf or garland.

Repeat the stem to the Ch 16.
Instead of ss in the 8th
ch, ss in the 12th ch.
The Loop-Hole just needs to be
large enough so the final flower will fit.
And continue to ss in the next 4,
and pull the yarn end through the final loop.
Insert the hook from
the inside of the hole, and pull up the final yarn end.
Pull the beg yarn end
to tighten the center hole.
Then tie the yarn end
with the beg yarn about 3 times tight and secure.
Snip the ends to about 1/4 to 1/8”
(.6 to .3cm). This will be covered and not show.
Flower
Center:
Start with a MR. Ch 1, 5 Sc in
ring. Join with a ss to the first sc. FO.
Pull taut to close the center
hole.
Hook the end yarn through the Back
Loop of the same sc that you joined.
This brings the yarn end to the
back.
Tie beg and end yarns together
about 3 times tight and secure.
Snip the ends to about 1/4 to 1/8”
(.6 to .3cm). This will be covered and not show.


5 Flower Petals:
With Wrong sides of Flower-Center and Stem-Top facing:
Work this entire round through both the back-loop of the Flower-Center AND
a front-loop of the Stem-Top :
Join petal-color with a ss in the
Back-Loop of the Flower-Center (one of the 5 sc’s)
AND a
Front-Top-Loop of the Stem-Top (one of the 5 sc’s)
(Ch 1, Dc, Ch 1, ss) all in the
same as first ss.
(Ss in next sc, Ch 1, Dc, Ch 1,
ss) all in one st and repeat 3 more times.
Ss in the same as first st to
join.
FO and weave in.
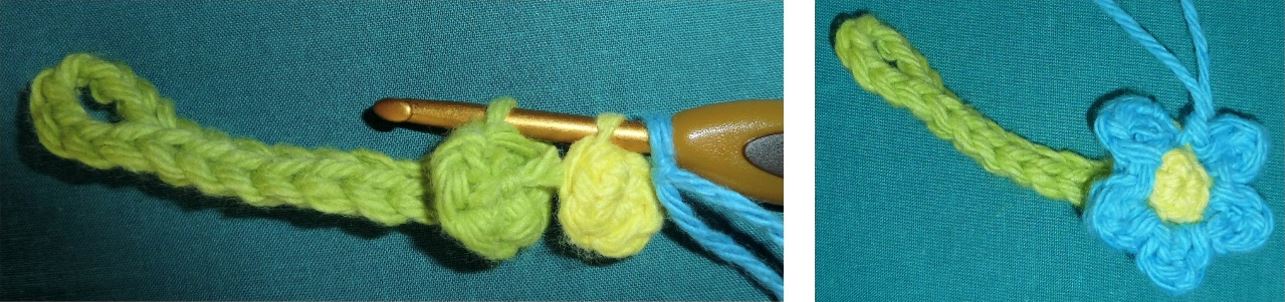
Link the bottom stem thru a loop in the next flower stem.
Continue until you have the length that you want.
To connect in a circle, put the Link-Stem through the last
loop,
and then put the first flower through the Big Loop.


Top Row are stems with 21 chains, instead of 16.
There are less flowers per strand, and it would look good as a necklace.
The bottom strand was made as per the instructions with 16 chains,
There are less flowers per strand, and it would look good as a necklace.
The bottom strand was made as per the instructions with 16 chains,
and four together make a great bracelet.
No comments:
Post a Comment